

Build your first Launchpad Blueprint
Have an idea for an application? Launchpad Blueprint helps you turn it into a structured app design in minutes.
Start by describing what you want your application to accomplish, and Blueprint will design the workflows, data, personas, and experiences behind your application.

Step 1: Describe the application you want to build
You don't need to begin with perfectly documented requirements. Start by telling Blueprint about the application you want to create.
Start with the problem you want your application to solve and the outcome you want it to achieve.
Keep this focused on the why behind the application rather than individual features.
Example:
Request, schedule, and complete maintenance or repair for equipment supporting aquaculture operations.
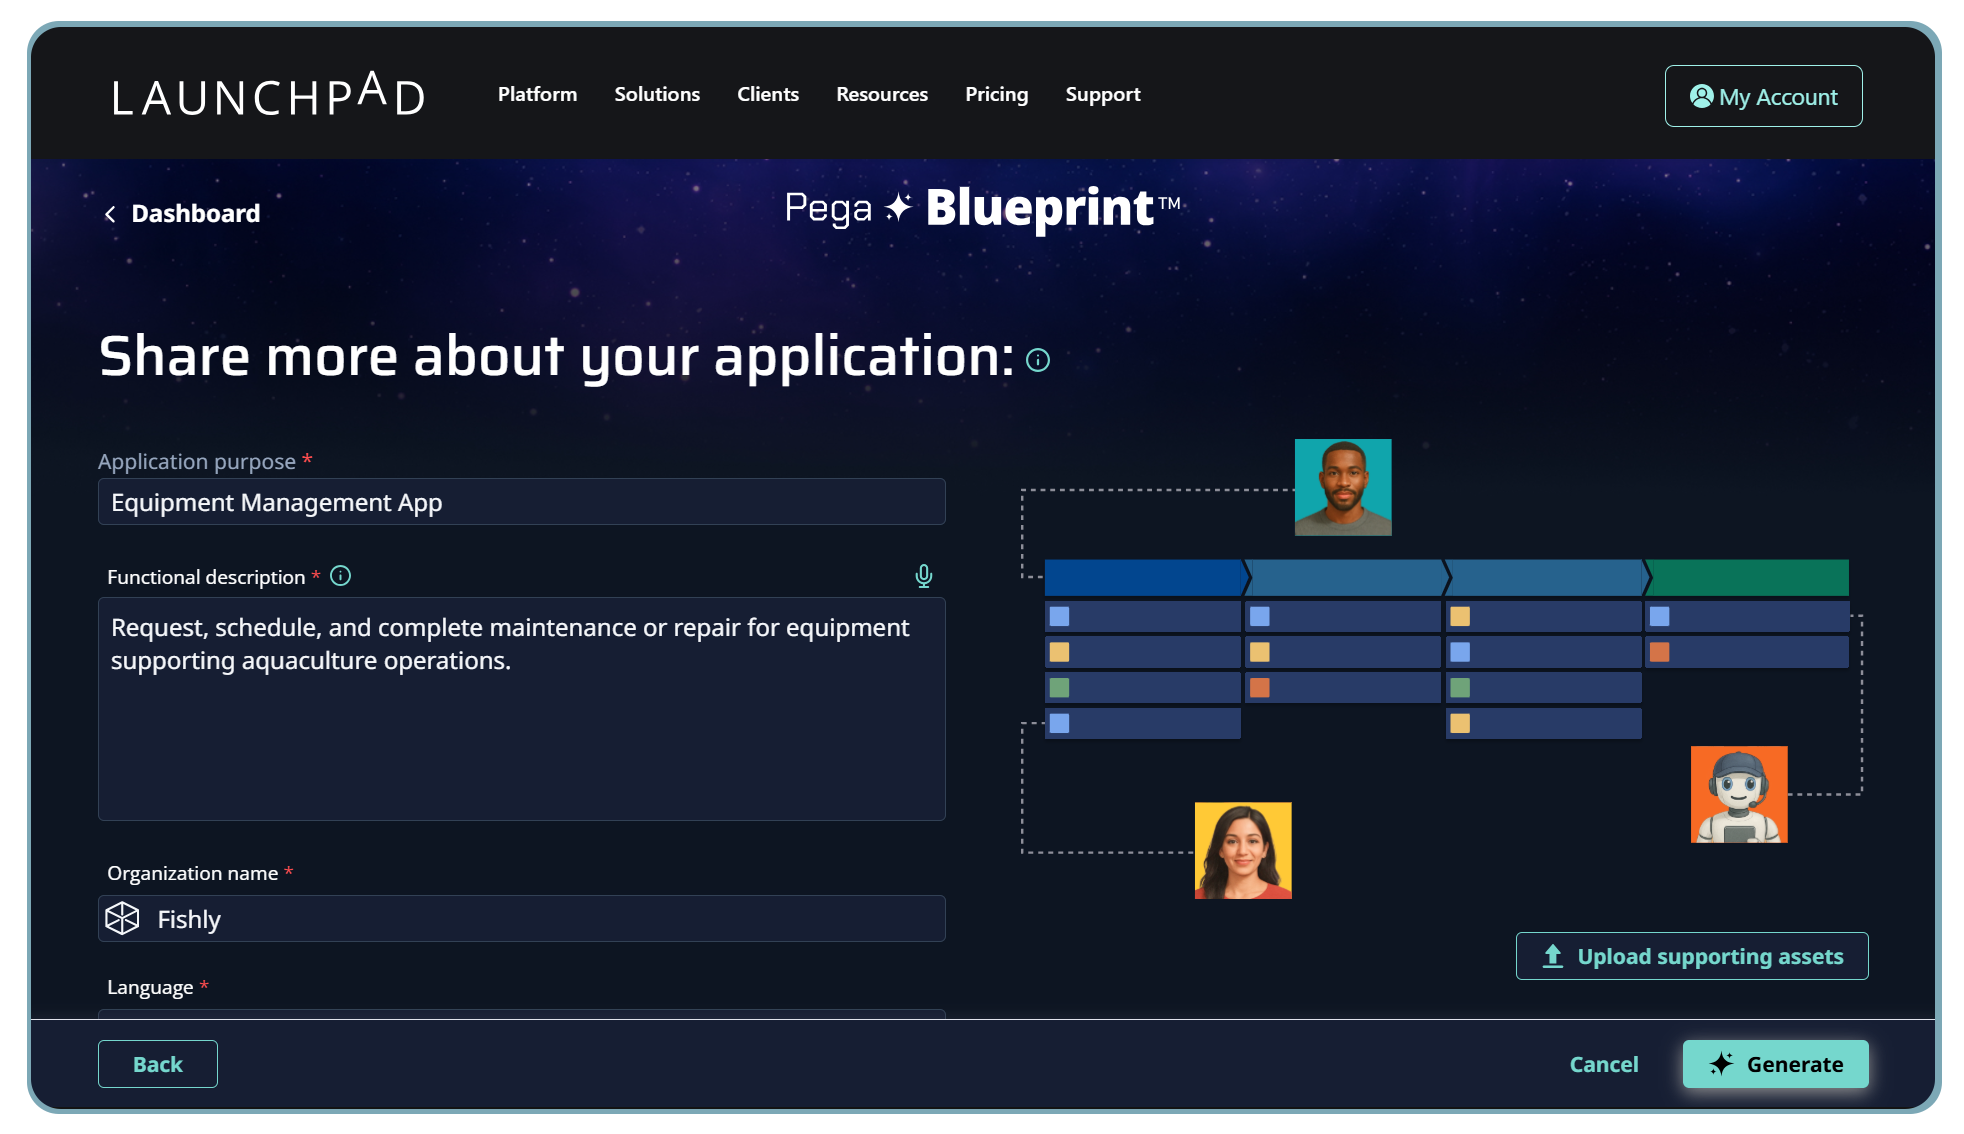
Next, describe what the application should do. Think about the major capabilities, processes, users, decisions, and information the application will need.
You don't have to account for every requirement at this stage. Give Blueprint enough context to understand how you envision the application working.
Example:
The application should manage maintenance requests, including prioritization, approval, scheduling, confirming resources, work completion, and potential follow-up work.
You can also upload supporting assets that provide additional context about the application you want to build.
If you've already created requirements, process documentation, supporting materials, product videos, or other relevant assets, add them to your Blueprint. This gives Blueprint more information about your business problem and what you need your application to accomplish.
Why this is helpful: Instead of starting over and manually translating your existing thinking into a new design, you can use the work you've already done as additional context for your Blueprint.
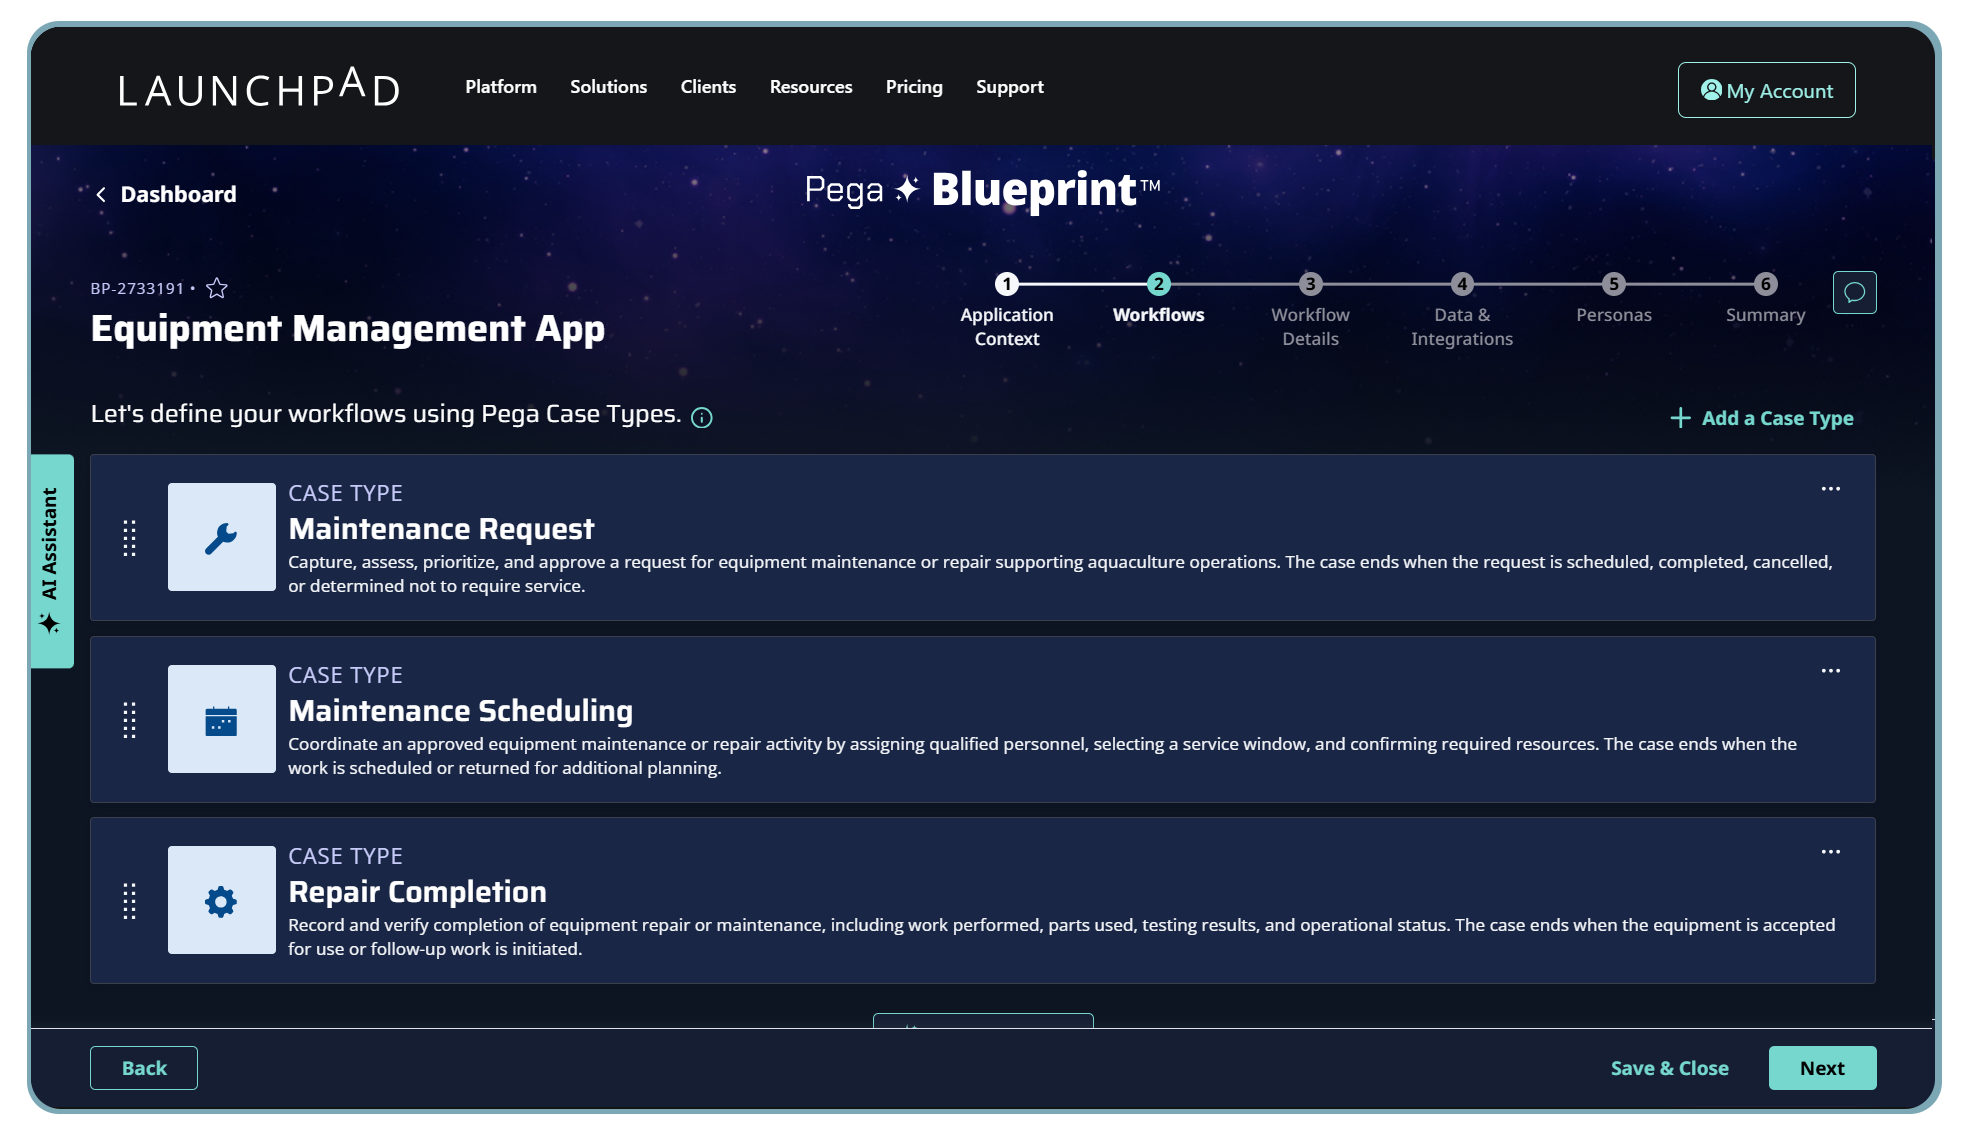
Step 2: Explore your AI-generated workflows
With your application requirements established, Blueprint begins turning your idea into processes.
Blueprint leverages AI combined with Pega's 40+ years of industry knowledge to help generate optimized agentic workflows for your application. These workflows are organized into case types, which represent the business process flows that make up your application.
Step 3: Explore and refine your processes
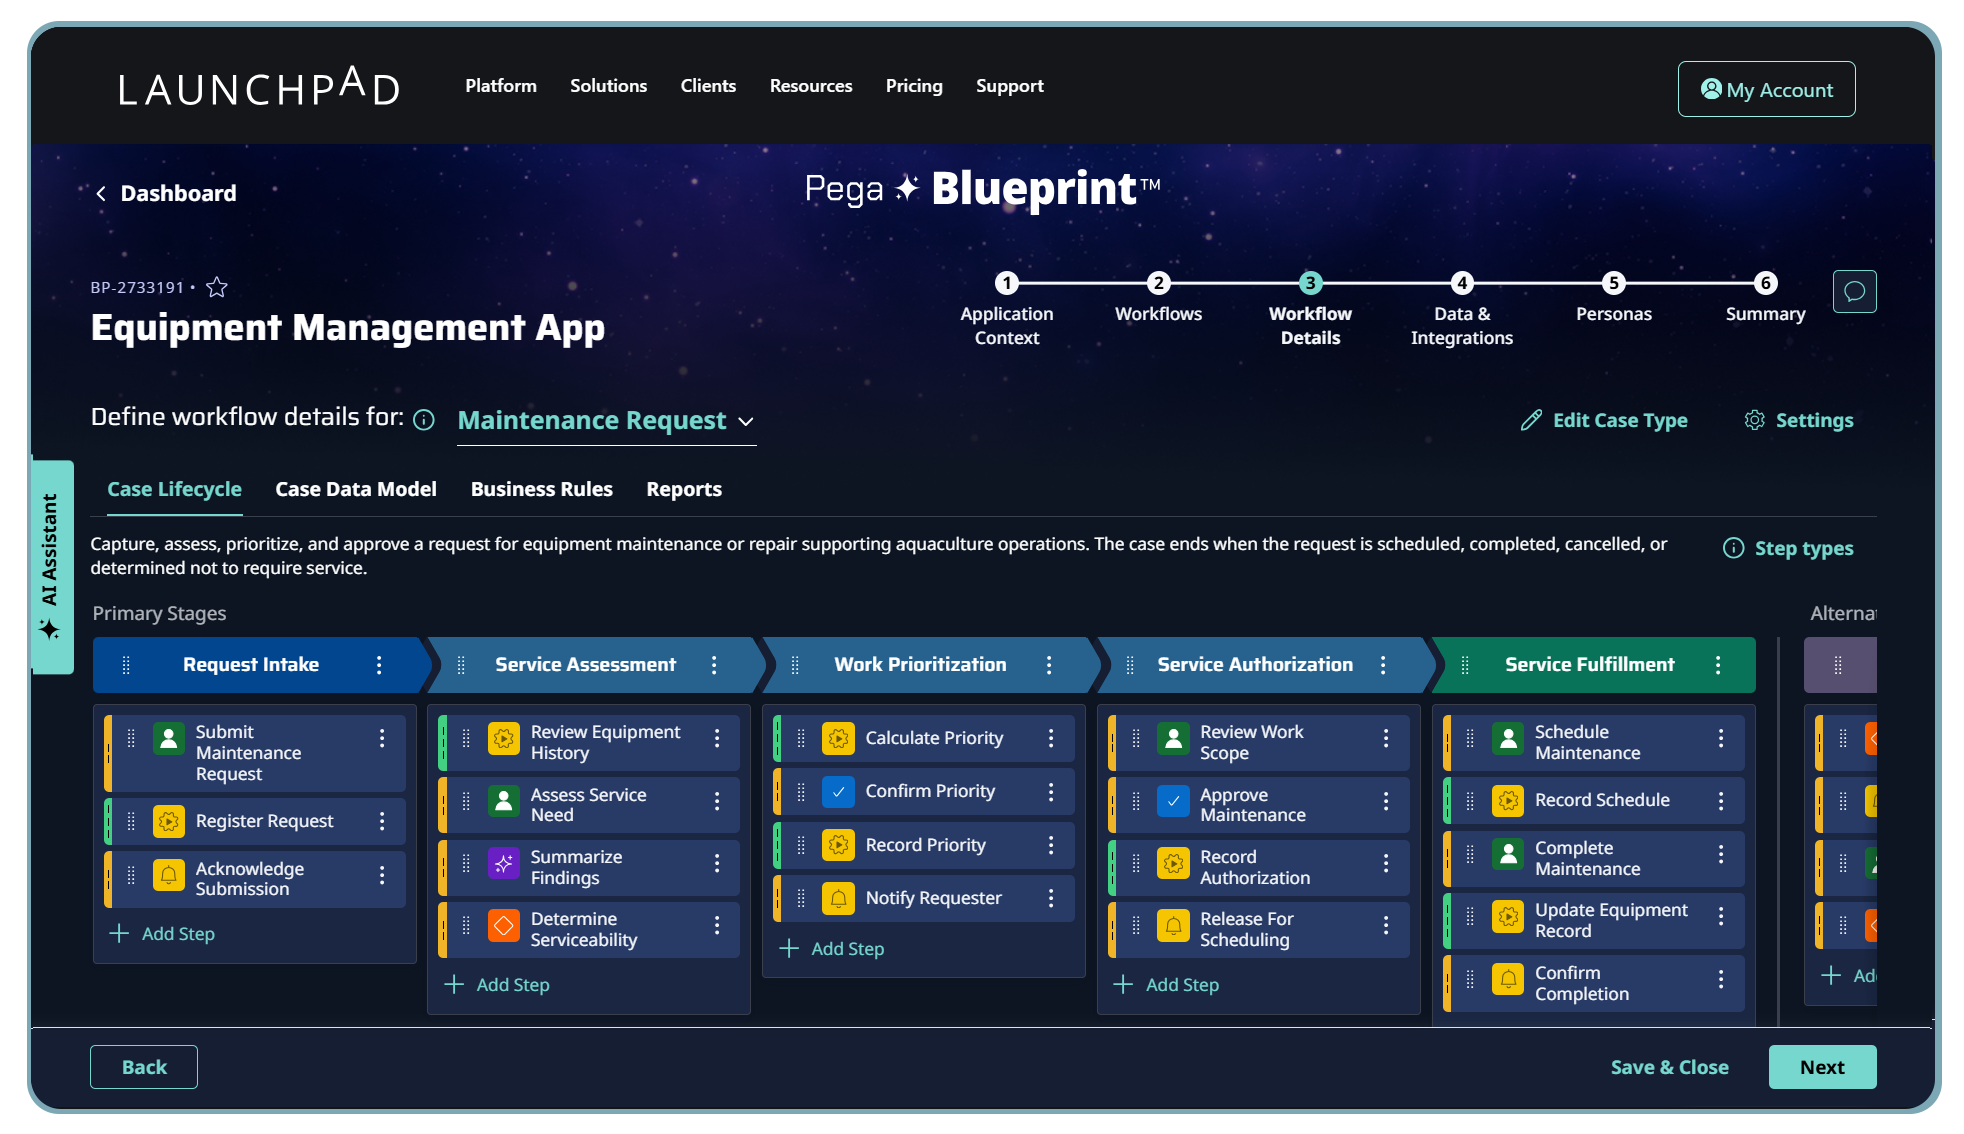
Now you can dig deeper into the processes Blueprint has created. Select a case type to explore the stages and individual steps involved in that process. This lets you understand not just what processes your application will support, but how the work within each process will actually get done.
Your process may include different types of steps, such as:
Human-centered steps, such as collecting information, reviewing a request, or completing a task.
Automated steps, where the app handles work without requiring manual intervention.
Decision logic, which determines what should happen next based on data or business rules.
AI-powered steps and AI Agents, which can participate in completing work.
Don't like something? Change it.
Your Blueprint is a starting point, not a finished specification.
Use the AI Assistant to adapt or enhance process flows using natural-language prompts. Describe what you'd like to change and let Blueprint help modify the design.
For example:
"Add a manager alert when work is more than 3 hours behind schedule."
If Blueprint has suggested case types you don't need, simply go back to step 2 and delete them to keep your application design focused and easy to understand.
Just exploring? You don't need to perfect everything now. Feel free to skip ahead and see what Blueprint creates next. You can always come back and refine your design later.
Looking inside your workflows helps you validate the actual mechanics of your application. You can see where people perform work, where automation takes over, where decisions happen, and where AI could contribute.

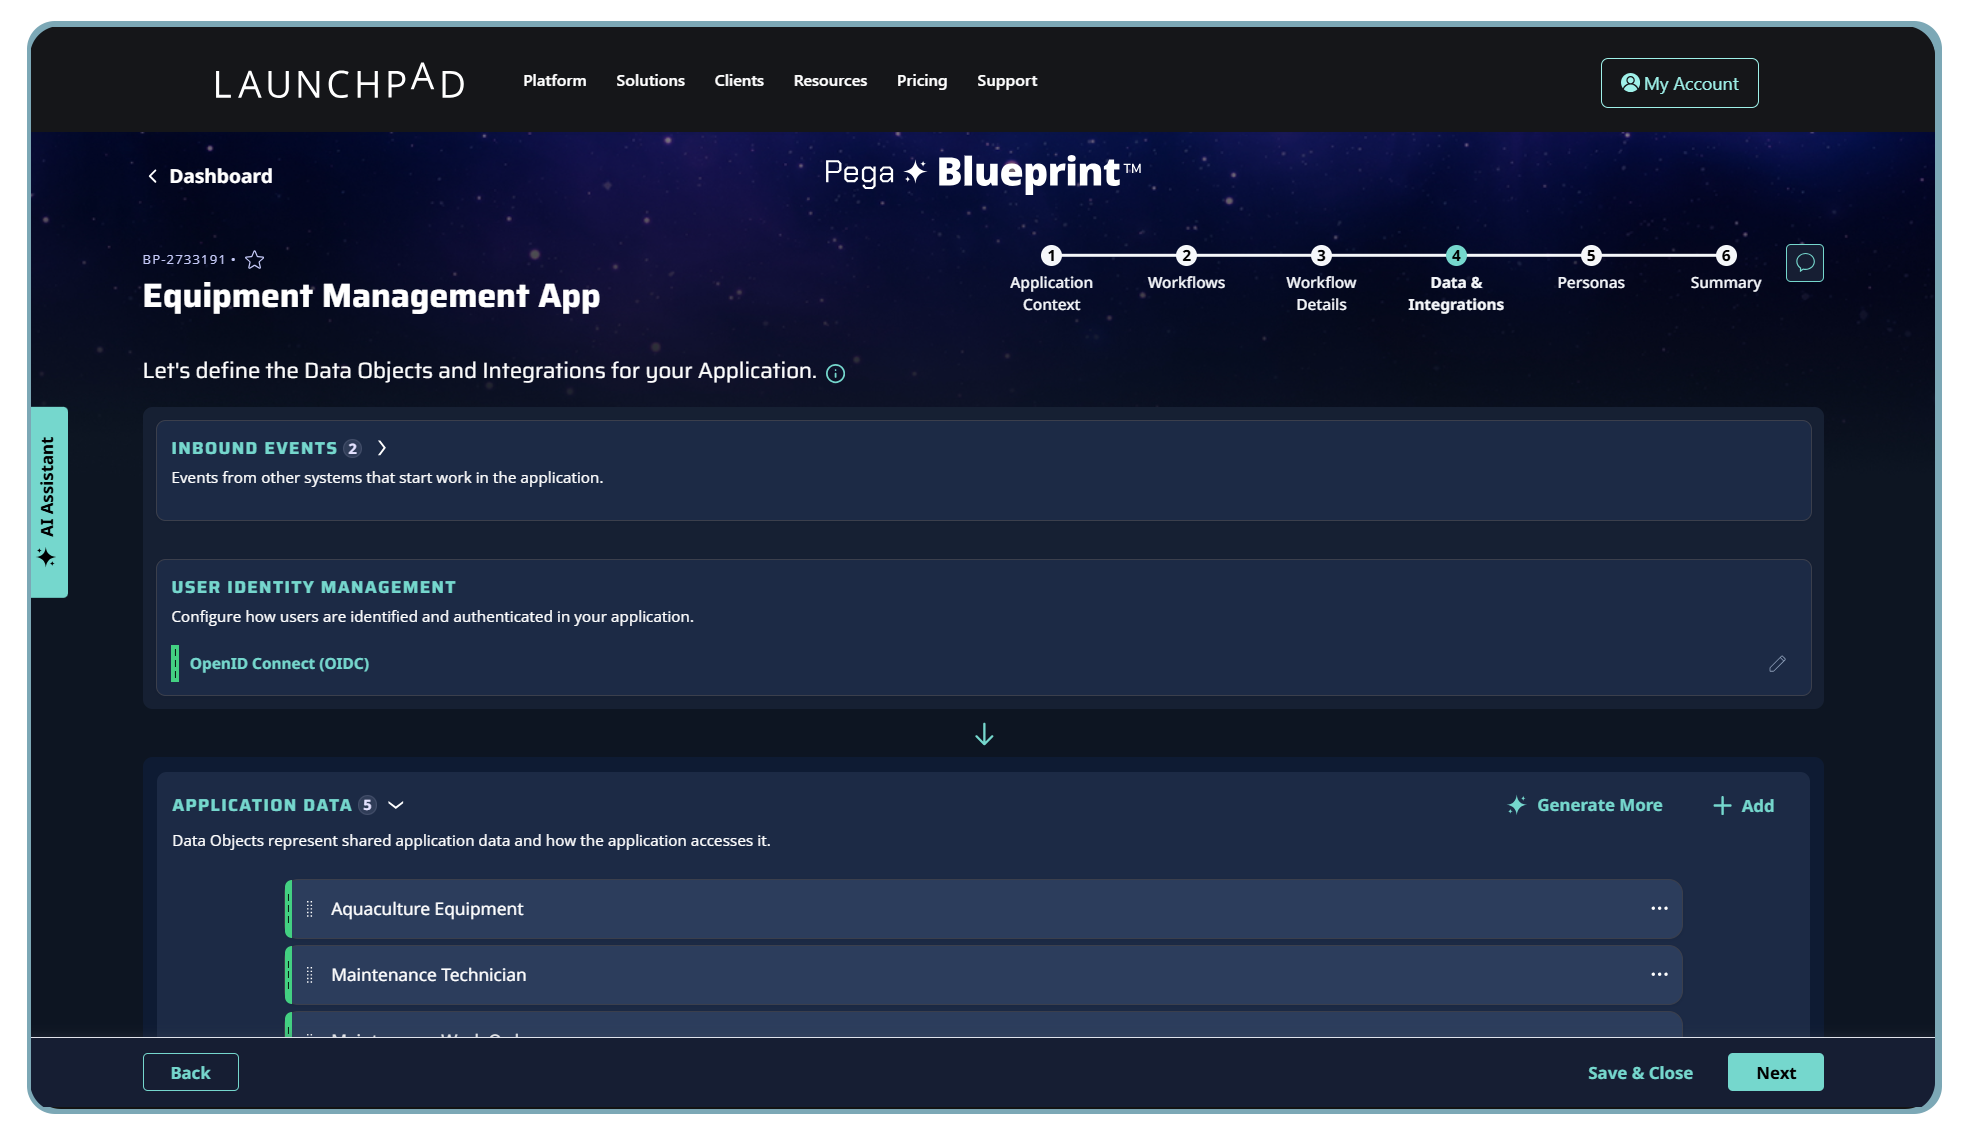
Step 4: Explore your data model
Processes need information to work. Next, Blueprint lets you explore the data model behind your application, including its data objects and integrations.
Review the information Blueprint proposes and consider whether it accurately represents what your workflows need.
And you don't have to modify the model entirely by hand. The AI Assistant is available here too, so you can use natural-language instructions to help make changes.
Later, when you import your Blueprint into Launchpad Studio, you can build up this foundation further using standard field types, object relationships, object references, embedded objects, and calculated fields.
Step 5: Design for the people using your application
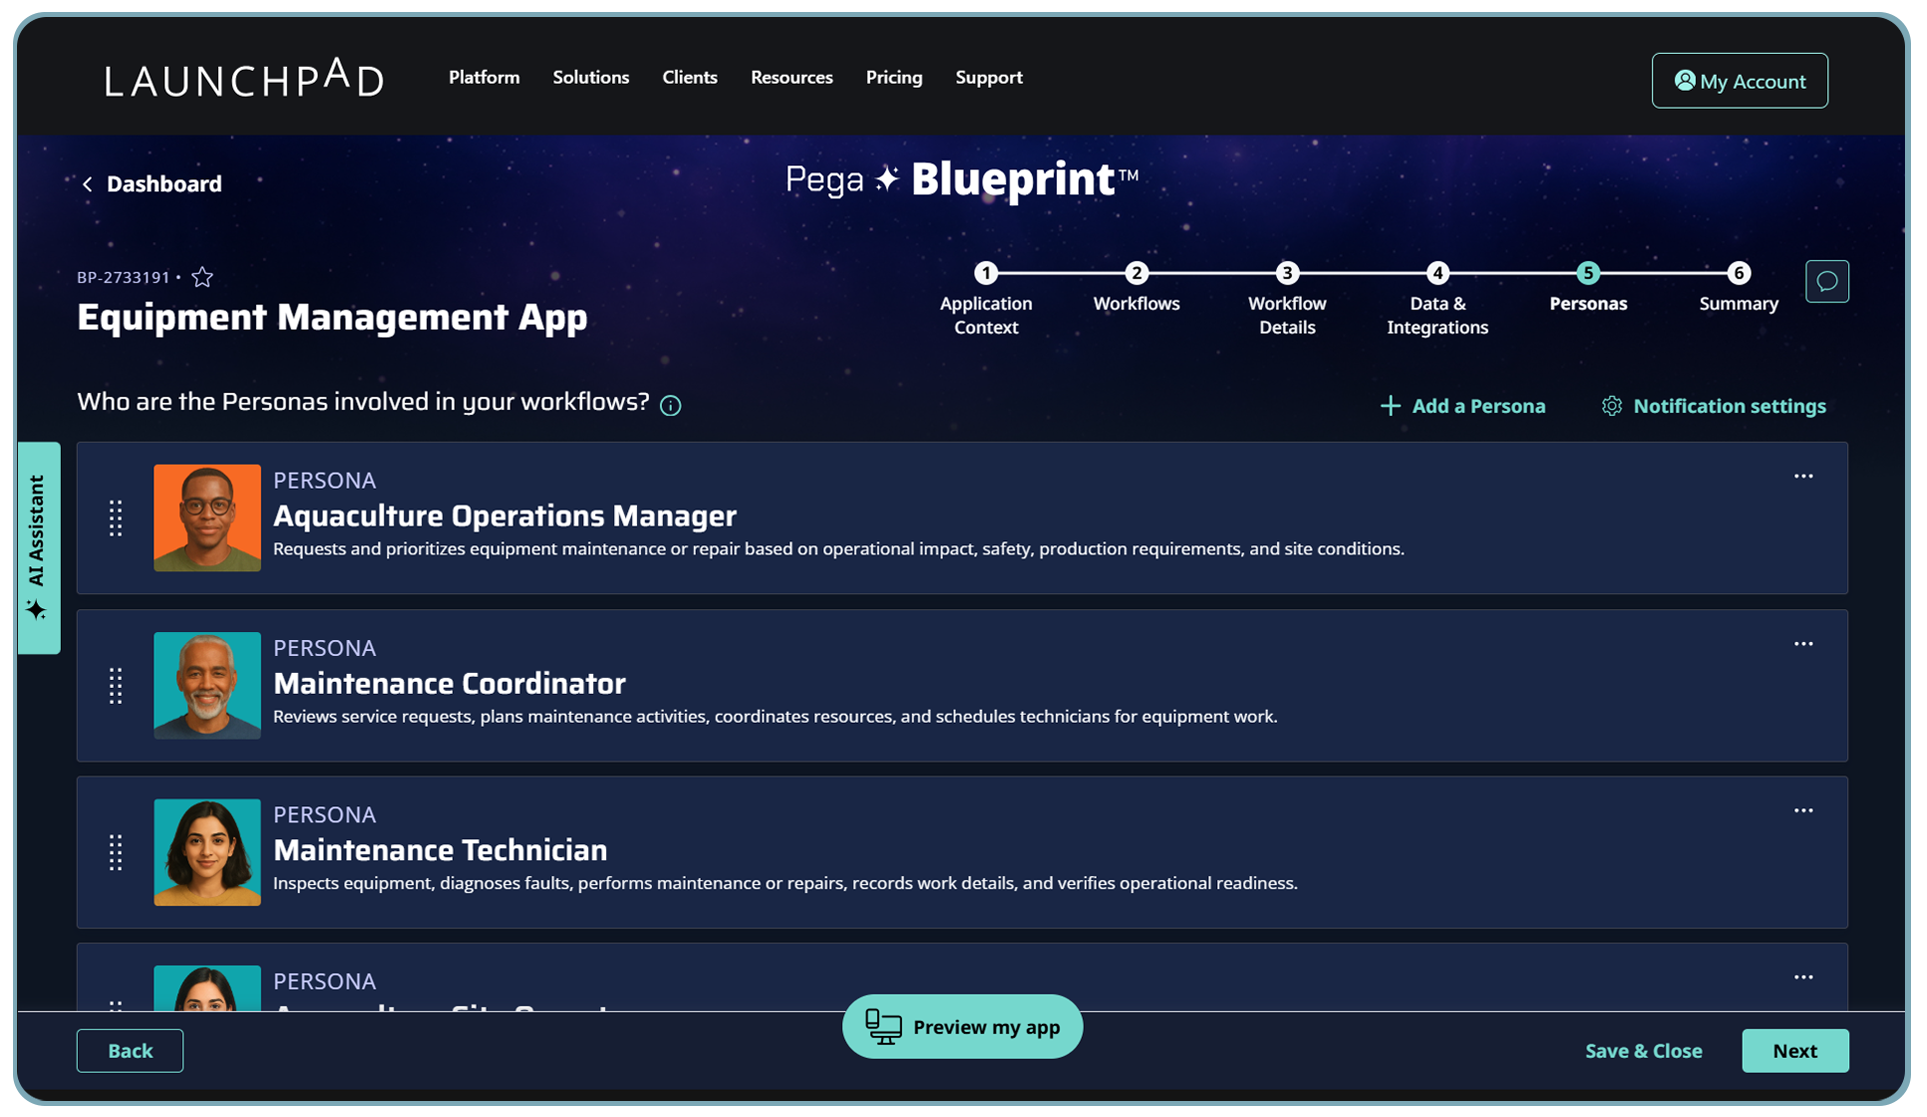
Blueprint presents the different personas involved in your workflows. These represent the people who could interact with your application, whether they're working in the back office, out in the field, managing processes, or interacting with your business as a customer.
Review the personas Blueprint has generated and make them your own. You can add or remove personas or ask Blueprint to generate additional personas for your application.
For example, an equipment maintenance application could include operations managers, maintenance coordinators, technicians, operators, and external service providers.
Step 6: Preview your app
Preview moves your application from an abstract set of requirements to something you can experience. It gives you and your stakeholders something tangible to react to before moving into full development. Select Preview my app at the bottom of the screen to explore the experience Blueprint has generated from your design.
Change the case type at the top of the screen to see how the experience changes across the different workflows in your application. Click through the workflow as though you're a real employee or customer using your application.
Ask yourself:
-Is the right information available at the right moment?
-Is it obvious what the user should do next?
-Could anything be automated or simplified?
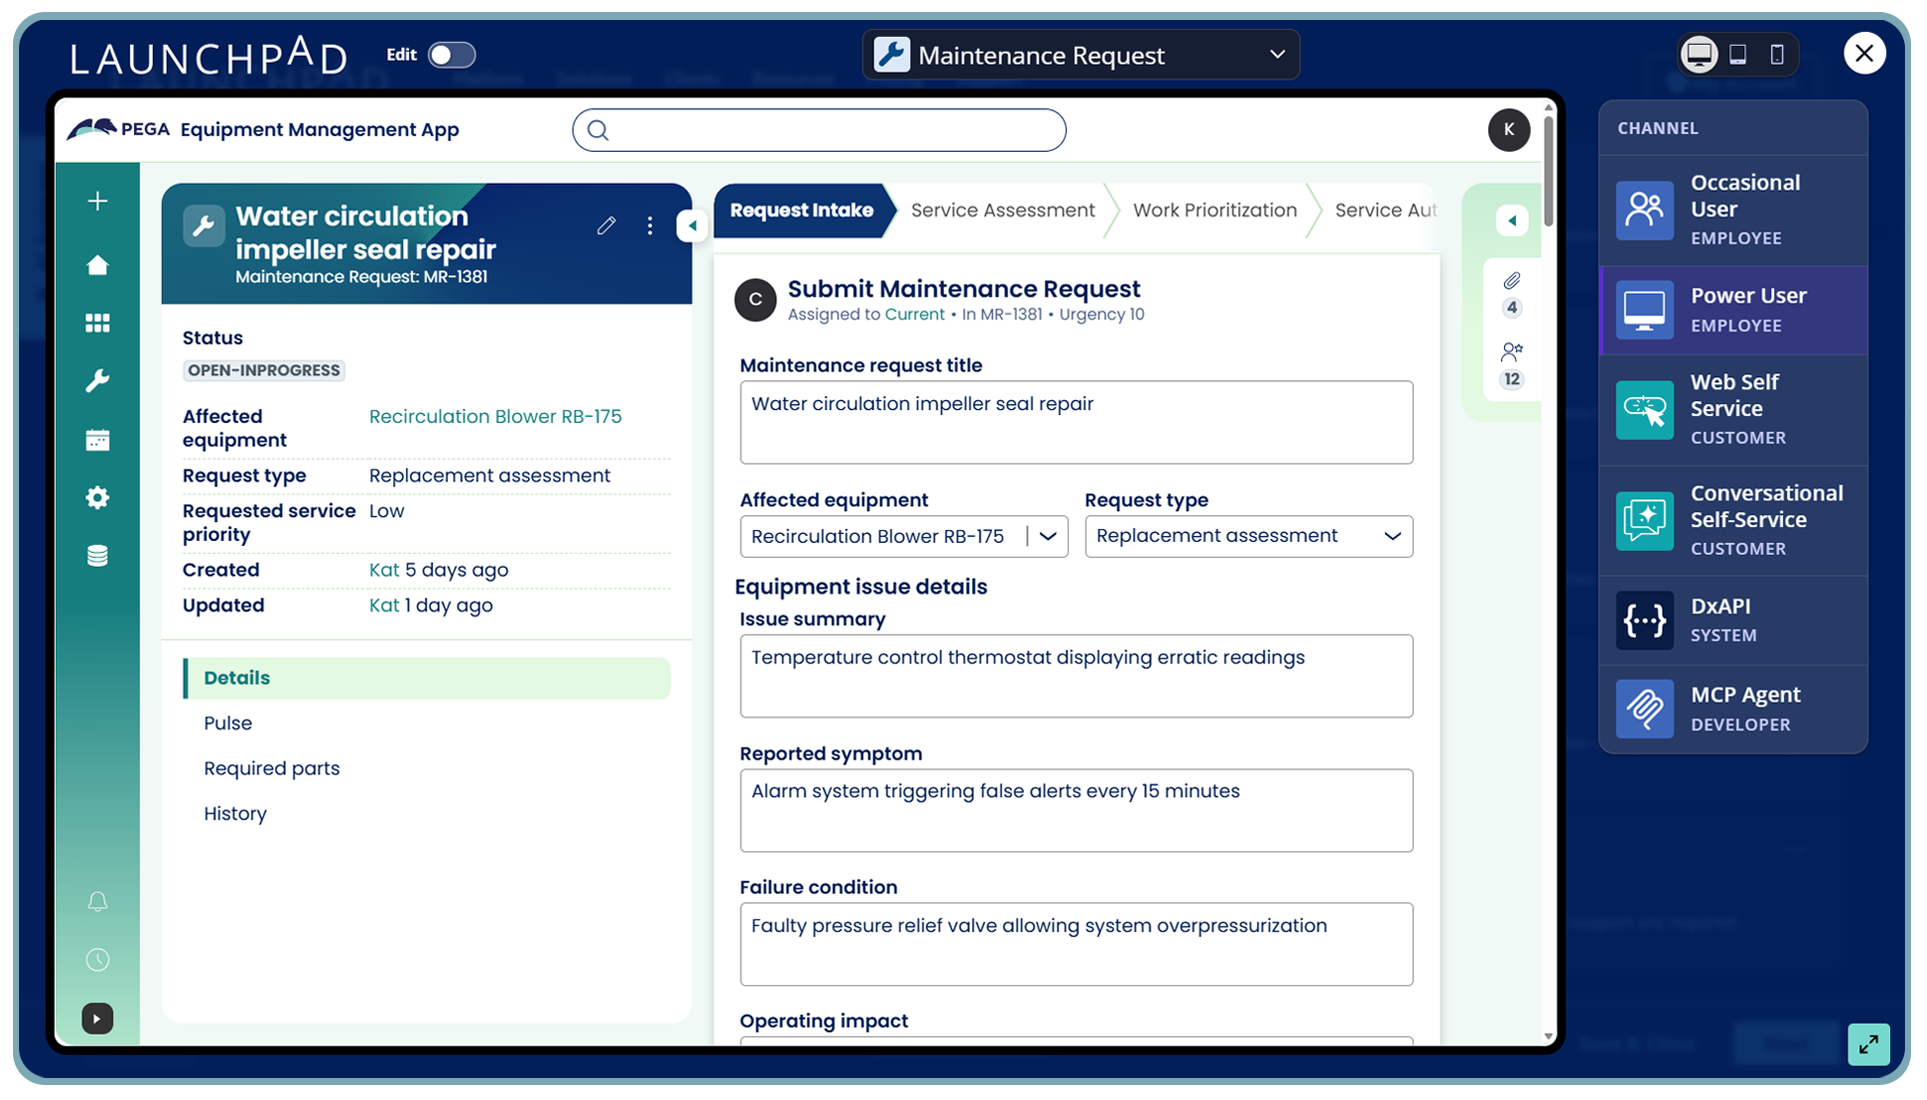
Explore how your application could work for different types of users and channels, including:
-Occasional user for an employee experience
-Power user for employees who work extensively in the application
-Web self-service for a customer-facing experience
-Conversational self-service for a chat-style customer experience
-DX API for a system experience
-MCP Agent for exploring your application through another AI assistant
With the MCP Agent option, you can preview your application using AI assistants and tools such as Claude, ChatGPT, Amazon Quick, Gemini, Copilot Studio, Perplexity, or Cursor.
You can see your app on different devices, too. Switch between desktop, tablet, and mobile views to consider how users could interact with your application in different environments.
Want to experiment with the visual design? Toggle to Design to quickly try different brand colors.
You can also open the AI Assistant on the left and use natural language to adapt the interface design.
Step 7: Review, share, and take the next step
Your Blueprint is ready. But your application is just getting started.
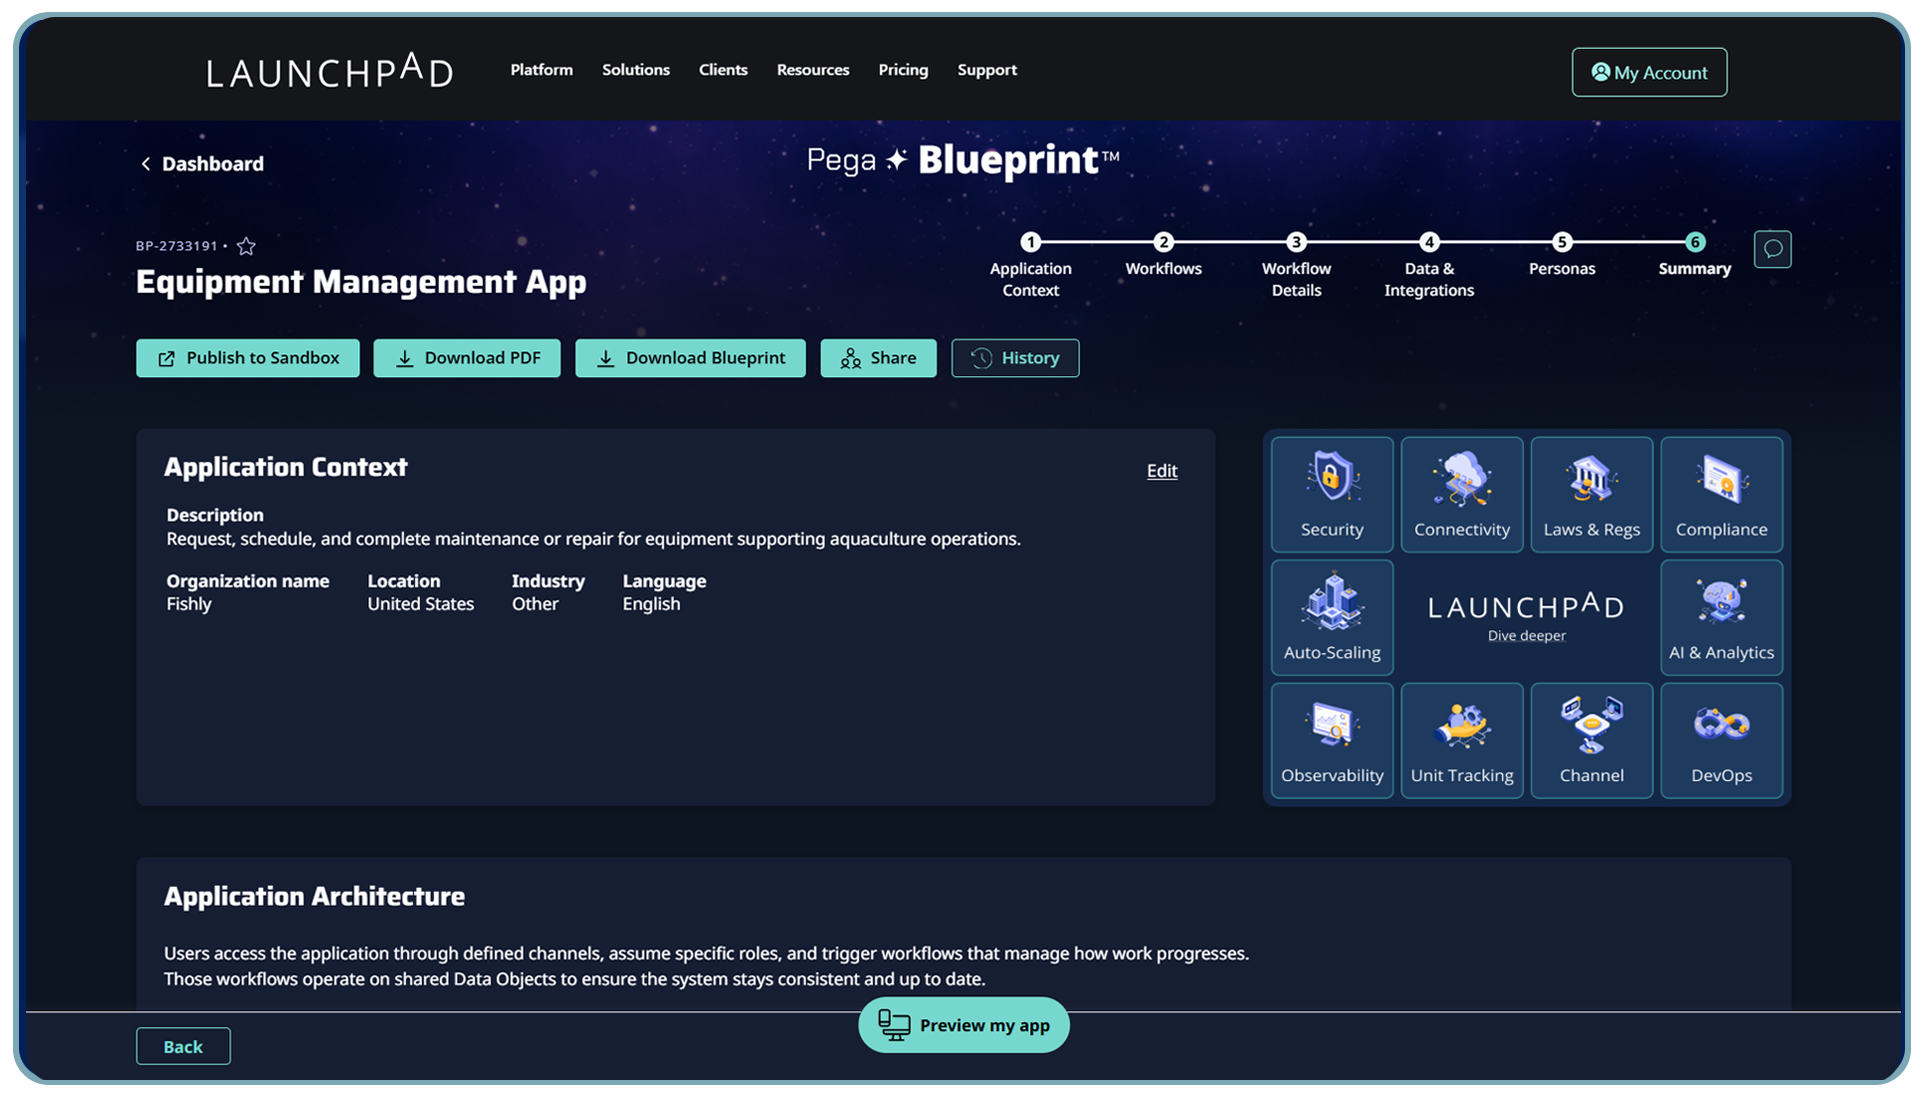
Your Blueprint summary brings your application design together so you can review the architecture you've created, including your workflows and data model. From here, you can:
-Download a PDF of your Blueprint.
-Download the Blueprint file for the application design you've created.
-Share your Blueprint with collaborators and stakeholders.
Your Blueprint doesn't have to be perfect before you finish. Think of it as a living application design that you can continue to improve as your requirements and ideas evolve.
Ready to turn your Blueprint into a production-ready application?
Take the next step with Launchpad Studio.
When you're ready, you can import your Blueprint directly into Launchpad Studio and continue refining and enhancing the application instead of starting over.
Your Blueprint becomes the starting point for further development across your workflows, data model, user experience, application logic, integrations, security, and more.
Watch how Tim Miranda imports his Blueprint into Launchpad Studio and uses the AI Assistant to make his app production ready.
You've designed the application. Now build it.
Launchpad Studio is available with a paid Launchpad plan. Contact our sales team to learn more about Launchpad Studio access and how to take your Blueprint from initial design to a production-ready application that's ready to take to market.